Maintaining Hue and Saturation through Post Processing

Randy

Well-known member
In another thread we were discussing the value of 32-bit processing vs 64-bit processing. In the past few days, I've done a study comparing the typical 32-bit workflow with a 64-bit workflow that produces excellent images for me. I'm a C++ aficionado and don't know how to make a nice web page for the presentation, so here is a PDF describing the process. This composite image shows the difference between processing flows, with the improved 64-bit results in the background.

Please let me know if this proves of value to you. If it works in broad situations, I'll find a way to make the PDF into a self-contained forum post.
Xdiff.jpg
 
I find this very interesting. I assume, for this to work, you have to start with unsaturated stars - which means I need some new data.

- Can you say more about how to use floor to improve the outcomes with NoiseX, and when (as in - when what conditions are present)?
- Can you say more about using saturation so early in the workflow? I don't think I've seen that before.
- Can you say more about the use of 'recip_E' before BlurX - what is the purpose and what does it do?

Thank you!
Mike
 
Were you using Blur Xterminator version 4 in your processing for this test? A lot of the details are over my head but a method for increasing quality of an image is welcome - increased DR would be great. Thanks for all the info.

Leah
 
Hi
I've just tried this on an old image of M 27 and compared with this new approach.
I found that the technique developed in the (very well written, IMHO) paper led to a very clean result, by monitoring the stats at each processing step. Great job!
Nonetheles, it would be interesting to have an explanation about the values retained for recipe_E / recap_Phi... beyond compressing the dynamic range, I have no clue about the values 1/e or any other in practice... what's the rule to select the suitable 'factor'?
I'll continue on other images and see if this improves my outcomes consistently.
Thanks!
 
Back in town after a few days. It's rewarding that the technique is working for others!

- Can you say more about how to use floor to improve the outcomes with NoiseX, and when (as in - when what conditions are present)?
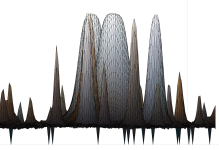
I was surprised at how many operations resulted in pixels of value 0.0. I'll look for an example image, but when 0.0 exists NoiseX will produce surprising deviations all the way to 0.0 from the general noise floor. Please remember that I don't have access to the code or concepts of RC Astro software and am deducing its operation from results. The height-field with X/Y views has shown me when they happen and a process of experimentation led to this discovery. If you're working in 32-bits, four zeros should be removed from the "lowest" variable value.

What leads to the presence of 0.0 pixels is not clear mathematically, but they can happen after LHE in a field with no stars. They arise in saturation increases, and other unexpected operations. As I learn the "why" behind it, I keep Statistics open at all times with Unclipped not checked. I want to see 100% after every operation. If it isn't 100%, I apply floor. This often brings it back to 100%, but there are times that normalization is part of an operation and gives rise to 1.0 pixels, as well. In that case, I undo floor and apply clamp. It could fairly be asked if removing a few 1.0 pixels is critical, and I must answer no. However, clamp does tell me how many saturated pixels exist, and if I feel there are too many, I repeat the previous convolution starting at a lower offset, continuing until only a few pixels are normalized to 1.0, if any.

- Can you say more about the use of 'recip_E' before BlurX - what is the purpose and what does it do?
The purpose is to give convolutions, particularly BlurX, enough working room to optimize their results. I hope Russell will give us an understanding, but the concept came from my desire to see hue spread evenly across star faces after stretching. I found 64-bits worked better simply because of higher precision, and in the height-field the stars were a bit tighter with more accurate hues. It appeared the BlurX tried to keep all the photon flux that exists pre-convolution in the result. The question arose: what if BlurX started with a lot of headroom? Could it perform its flux-conservation more effectively? It worked.

I had Statistics open during LHE and saw similar excursions, so I applied recip_E and saw better results in the image. LHE doesn't seem to normalize by default, so a floor application is often all that's necessary before a second LHE. At the end, you can self-normalize the nebulosity with PixelMath to whatever brightness suits the scene.

- Can you say more about using saturation so early in the workflow? I don't think I've seen that before.
This was very surprising. My blue channel is always the tightest and seemed to [come out] less saturated than the longer wavelengths. Well, all the flux was in a small area, so increased headroom allowed an even saturation increase across wavelength. Here, one must be careful. For the study, I applied saturation as the first step, as it's frequently first in people's workflow (at least on CN). I've found the very best place to apply saturation is after the first BlurX step: Correct Only. Russell mentions using it this way, and in this application, Correct Only brings channel FWHMs in line and corrects poor PSFs. In this condition, saturation is more accurately applied across the undistorted star faces.

I have a family life, so I need to take a break. I'll be back with more discussion and a NoiseX image. Thank you for posting your results! I'm pleased you find the technique works for you.
 
Last edited:
Nonetheles, it would be interesting to have an explanation about the values retained for recipe_E / recap_Phi... beyond compressing the dynamic range, I have no clue about the values 1/e or any other in practice... what's the rule to select the suitable 'factor'?
To be kind, it was determined empirically. I have a number of PixelMath tool icons at various percentages. Over several days and many images at 32- and 64-bits, I found factors that generally worked and cases where care was needed. Saturation needs the least reduction possible or the background noise inherits too much saturation. I tried the factor 0.1, thinking "this will decrease the exponent but not the mantissa". In fact, the factor of 0.1 works well at times. recipE was a conjecture: our signal needs hyperbolic stretching, an exponential process. Dividing the values by the natural logarithm seemed wise and proved the most effective in general, implemented as multiplying by the inverse for speed. The use of phi came about as a conjecture from its pervasive occurrence in natural settings, and recipPhi serves well as the stepping-stone between 80% and 50%.

The best results come when watching Statistics and experimenting, as each image has its own nuances. BlurX Correct Only as step one is so important I'll probably modify the PDF to include it.

Here's the image that led to the floor function. These spikes no longer occur when floor is applied prior to NoiseX.
 

Attachments

  • 3D BX25-90.png
    3D BX25-90.png
    429.3 KB · Views: 20
Hi Randy, many thanks for your explanations and insights. I'll experiment on my side as well and share.
BTW, I tried on the Bubble Nebula but miserably failed, I must have missed something :(
 
Best of success to you, rodolgo. If you find a step that blows up, post it for all to see. Your experience won't be unique as people try this. Please note: you're working in linear and will need to reset the STF (Ctrl+A) regularly. That might have been your glitch after "compressing" the data. For that matter, I prefer 64-bits because I know these linear compressions take nothing away from the image itself.

Now let me demonstrate a surprise that's a huge contributor to hue loss. If you want to use a non-linear convolution such as LHE, it's often best to remove the stars beforehand. I use StarX for this with Large Overlap checked. (I have an NVIDIA RTX 3080 with its multi-thousand GPU array and follow the documented steps in this forum to bring it on line. It you have the GPUs, you'll be astonished at the speed enhancement of the RC_A tools and others.)

The example uses a preview of the carefully exposed image of M106, in which no pixel ever reached 65535 on the QHY268M on any subframe. Did you ever wonder what "Unscreen Stars" really did? The re-insertion equation ~((~$T)*(~stars)) works - but why? in the attached image, StarX was run on the same preview image, with Unscreen Stars checked and unchecked. The results are clear: Unscreen Stars flat-tops the stars, all to about 1.0, varying PSF radius by intensity. The graceful PSFs are lost as are the interrelationships between their size and intensity.

This is a feature; it must have a reason. What it does is allow stars to be re-inserted into images that have been significantly manipulated without overshoot. If the stars are simply added into a highly stretched image, the 0.0->1.0 normalization range could be overshot and one must be conscious of it. Nonetheless, if accurate hues and PSFs are important to you, you should not Unscreen Stars, then you should add them back with $T+stars and check you statistics. I believe PM leaves stars > 1.0 untouched from some Juan notes elsewhere, but I've not yet come up with a normalize tool nor verified >1.0 is allowed. I just compress the nebulosity with PM until there are few or no saturated pixels.

Please remember: using $T+stars is image-dependent! If you add stars into highly-stretched field, they may exceed 1.0 and the results are undefined as of now. I've not run into it, but I expect to.
 

Attachments

  • Screening.jpg
    Screening.jpg
    467.3 KB · Views: 11
Back
Top